由于电脑重装,原始备份已经消失,故此记录一下Hexo重新部署过程,以及遇到的一系列问题。
准备
目前环境
安装Hexo
下载
建议开启梯子,否则下载速率很低甚至卡死,并依次执行如下命令:
1
2
|
npm install -g hexo-cli
|
使用hexo -v可进行版本查询,本教程当前版本如下,用以参考:
1
2
3
4
5
6
7
8
9
10
11
12
13
14
15
16
17
18
19
20
21
22
23
24
25
26
| INFO Validating config
hexo: 7.3.0
hexo-cli: 4.3.2
os: win32 10.0.22631 undefined
node: 18.18.2
acorn: 8.10.0
ada: 2.6.0
ares: 1.19.1
brotli: 1.0.9
cldr: 43.1
icu: 73.2
llhttp: 6.0.11
modules: 108
napi: 9
nghttp2: 1.57.0
nghttp3: 0.7.0
ngtcp2: 0.8.1
openssl: 3.0.10+quic
simdutf: 3.2.14
tz: 2023c
undici: 5.26.3
unicode: 15.0
uv: 1.44.2
uvwasi: 0.0.18
v8: 10.2.154.26-node.26
zlib: 1.2.13.1-motley
|
配置
在根目录下找到_config.yml文件,按照教程进行配置即可。
同时注意,需要下载插件以开启对图片的支持
1
| npm install https://github.com/CodeFalling/hexo-asset-image --save
|
然后把 _config.yml中的 post_asset_folder设为 true,以后,每一篇文章将对应一个同名同目录的文件夹用于保存自己的资产。
安装Cactus
下载与部署
Cactus是一款简洁且颜值极高的主题,也是我很喜欢的一款主题,只需要按照教程部署即可,但请注意:
- 本主题支持中文,请勿
\themes\cactus\_config.yml文件中使用中文定义nav,而是将根目录下_config.yml文件中配置language: zh-CN;
- nav中已经实现了
archives、tags、categories、search的模板,其他模板需要自己定义page实现;
- 使用Utterances评论系统时,请将文章的文件名设置为英文,标题可以允许中文存在,否则评论框无法加载;
- 要使用全部功能,请安装search和feed插件,说明文档中存在,不要忘记;
- 请将代码主题修改为
本教程使用版本Commits on May 16, 2024
备案号
打开\themes\cactus\source\css\_partial\footer.styl,找到这段代码并修改如下:
1
2
3
4
5
6
7
8
9
10
11
12
13
14
15
16
17
18
19
20
21
22
23
| @media (min-width: 39rem)
#footer
display: flex
flex-flow: column wrap
justify-content: space-between
align-items: center
align-content: center
margin-bottom: 20px
.footer-left
align-self: flex-start
margin-right: 20px
.footer-right
align-self: flex-end
.footer-top
text-align: center
.footer-bottom
text-align: center
.footer-record
text-align: center
|
打开\themes\cactus\layout\_partial\footer.ejs,并将文件全文修改如下:
1
2
3
4
5
6
7
8
9
10
11
12
13
14
15
16
17
18
19
20
21
22
23
24
25
26
| <footer id="footer">
<!-- 导航链接 -->
<div class="footer-bottom">
<nav>
<ul>
<% for (var i in theme.nav) { %><!--
--><li><a href="<%- url_for(theme.nav[i]) %>"><%= __('nav.'+i).replace("nav.", "") %></a></li><!--
--><% } %>
</ul>
</nav>
</div>
<!-- 版权信息 -->
<div class="footer-top">
<%= __('footer.copyright') %> ©
<% var endYear = (theme.copyright && theme.copyright.end_year) ? theme.copyright.end_year : new Date().getFullYear() %>
<% var startYear = (theme.copyright && theme.copyright.start_year) ? theme.copyright.start_year : new Date().getFullYear() %>
<%= startYear >= endYear ? endYear : startYear + "-" + endYear %>
<%= config.author || config.title %>
</div>
<!-- 备案号部分 -->
<div class="footer-record">
<a href="https://beian.miit.gov.cn/"><%= theme.record.number ? theme.record.number : "未备案" %></a>
</div>
</footer>
|
打开\themes\cactus\_config.yml,添加如下代码:
效果如下图所示:

分享链接
修改如下文件\themes\cactus\layout\_partial\post\share.ejs,例如:
1
2
3
4
5
| <ul>
<li><a class="icon" href="http://connect.qq.com/widget/shareqq/index.html?url=<%= page.permalink %>&sharesource=qzone&title=<%= page.title %>&desc=<%= page.excerpt %>"><i class="fab fa-qq <%= icon_class_name %>" aria-hidden="true"></i></a></li>
<li><a class="icon" href="mailto:?subject=<%= page.title %>&body=Check out this article: <%= page.permalink %>"><i class="fa-solid fa-envelope <%= icon_class_name %>" aria-hidden="true"></i></a></li>
<li><a class="icon" href="http://service.weibo.com/share/share.php?url=<%= page.permalink %>&sharesource=weibo&title=<%= page.title %>"><i class="fab fa-weibo <%= icon_class_name %>" aria-hidden="true"></i></a></li>
</ul>
|
字号
对于侧边菜单栏,打开文件\themes\cactus\source\css\_partial\post\actions_desktop.styl,并且修改如下:
1
2
3
4
5
6
7
8
9
10
11
12
13
14
15
16
17
18
19
20
21
22
23
24
25
26
27
28
29
30
31
32
33
34
35
36
37
38
39
40
41
| #toc
float: right
clear: both
overflow: auto
margin-top: 1rem
padding-right: 2rem
max-width: 20em
max-height: calc(95vh - 7rem)
text-align: right
a:hover
color: $color-link
.toc-level-1 > .toc-link
display: none
.toc-level-2
color: $color-text
font-size: 1rem
&:before
color: $color-accent-1
content: "#"
.toc-level-3
color: $color-meta
font-size: 0.9rem
.toc-level-4
color: darken($color-meta, 20%)
font-size: 0.7rem
.toc-level-5
display: none
.toc-level-6
display: none
.toc-number
display: none
|
调整到自己满意即可。
对于正文,应该修改\themes\cactus\source\css\_variables.styl文件,同时字体族设置为幼圆:
1
2
3
4
5
6
7
8
9
10
11
12
13
|
$font-family-body = "幼圆", "Microsoft YaHei", "PingFang SC", sans-serif
$font-family-mono = "幼圆","Roboto", "Arial", sans-serif
$font-size = 18px
$line-height = 1.65
$code-line-height = 1.4
$page-width = 0rem + (hexo-config("page_width") || 39)
$logo-width = 0px + (hexo-config("logo.width") || 0)
$logo-height = 0px + (hexo-config("logo.height") || 0)
$logo-grayout = hexo-config("logo.grayout") || false
$colors = hexo-config("colorscheme") || "dark"
|
对于代码,在字体部分已经添加变量$code-line-height = 1.4 ,同时需要修改\themes\cactus\source\css\style.styl文件以获得调整大小和行高的功能,设置如下:
1
2
3
4
5
6
7
8
9
10
| pre
overflow-x: auto
padding: 10px 15px
padding-bottom: 0
border: 1px dotted $color-border
border-radius: 4px
font-size: $font-size
font-family: $font-family-mono
line-height: $code-line-height
......
|
将代码的字体大小和正文统一,行高单独调整即可。
字体自定义
注意,支持中文的字体文件通常比较大,加载时间久,用户体验不会很好!
修改\themes\cactus\source\css\_fonts.styl文件,添加你的字体配置:
1
2
3
4
5
6
| @font-face {
font-style: normal;
font-family: "LXGW";
src: local("霞鹜文楷"),
url("../lib/lxwk/LXGWWenKai-Regular.ttf") format("truetype");
}
|
修改\themes\cactus\source\css\_variables.styl文件,这份文件规定了正文的字体大小、行高等设置,根据喜好进行设置即可,示例如下:
1
2
3
4
5
6
7
8
9
10
11
12
|
$font-family-body = "霞鹜文楷","LXGW","Menlo", "Meslo LG", monospace
$font-family-mono = "霞鹜文楷","LXGW","Menlo", "Meslo LG", monospace
$font-size = 16px
$line-height = 1.725
$page-width = 0rem + (hexo-config("page_width") || 39)
$logo-width = 0px + (hexo-config("logo.width") || 0)
$logo-height = 0px + (hexo-config("logo.height") || 0)
$logo-grayout = hexo-config("logo.grayout") || false
$colors = hexo-config("colorscheme") || "dark"
|
CDN加速
目前暂时放弃,等图片较多时再来考虑
常用命令
1
2
3
4
5
6
| hexo clean
hexo g
hexo d
hexo g -d
hexo s
hexo new [title]
|
Typora
激活
准备如下:
步骤:
- 正常安装Typora
- 找到Typora安装目录,将激活脚本解压并放入
- 以管理员身份运行 CMD
- 在CMD中依次运行 node_inject.exe脚本文件和license-gen.exe
注意,运行license-gen.exe后会显示序列号,即激活序列号,邮箱可以随意填写假邮箱即可。
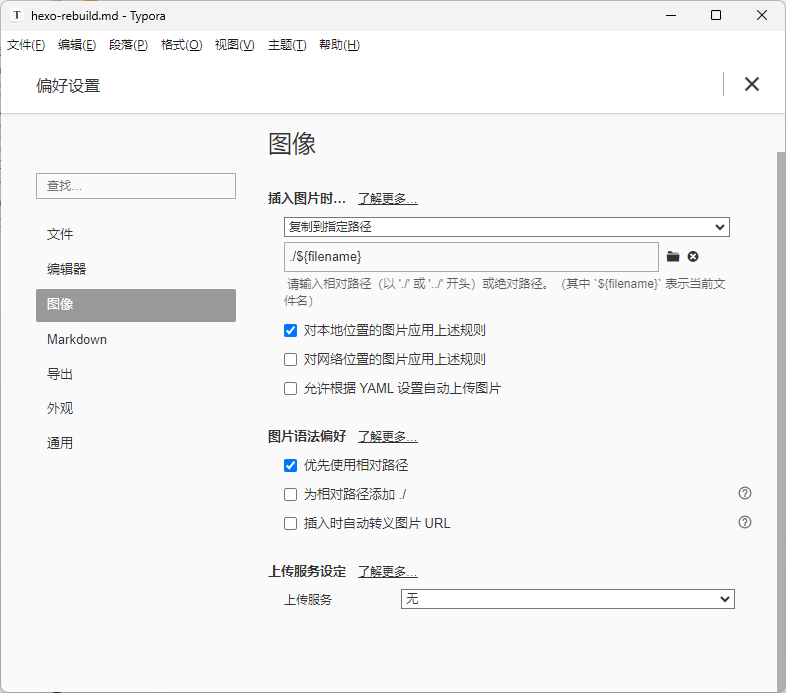
配置
打开Typora的偏好设置,并进行如下修改:
https安全警告
证书申请
推荐来此加密
上传证书
在合适的位置创建文件夹SSL;
将生成的文件放进该文件夹,这里以/etc/letsencrypt/live/lixintao.cn/文件夹举例;
编辑 Nginx 的配置文件,一般位于/etc/nginx/nginx.conf,可通过 nginx -t 命令查看。同时,配置好http到https的重定向。
1
2
3
4
5
6
7
8
9
10
11
12
13
14
15
16
17
18
19
20
21
22
23
24
25
26
| server {
listen 443 ssl;
server_name lixintao.cn;
ssl_certificate /etc/letsencrypt/live/lixintao.cn/fullchain.pem;
ssl_certificate_key /etc/letsencrypt/live/lixintao.cn/privkey.pem;
ssl_session_timeout 5m;
#请按照以下协议配置
ssl_protocols TLSv1.2 TLSv1.3;
#请按照以下套件配置,配置加密套件,写法遵循 openssl 标准。
ssl_ciphers ECDHE-RSA-AES128-GCM-SHA256:HIGH:!aNULL:!MD5:!RC4:!DHE;
ssl_prefer_server_ciphers on;
location / {
#网站主页路径。此路径仅供参考,具体请您按照实际目录操作。
#例如,您的网站主页在 Nginx 服务器的 /etc/www 目录下,则请修改 root 后面的 html 为 /etc/www。
root /var/www/hexo;
index index.html index.htm;
}
}
server {
listen 80;
server_name lixintao.cn;
return 301 https:
}
|
将配置生效,依次输入以下命令
1
2
| nginx -s reload
systemctl restart nginx.service
|
验证
使用http登录网址,会发现自动跳转到https,并且出现可信赖图标,如下图所示:
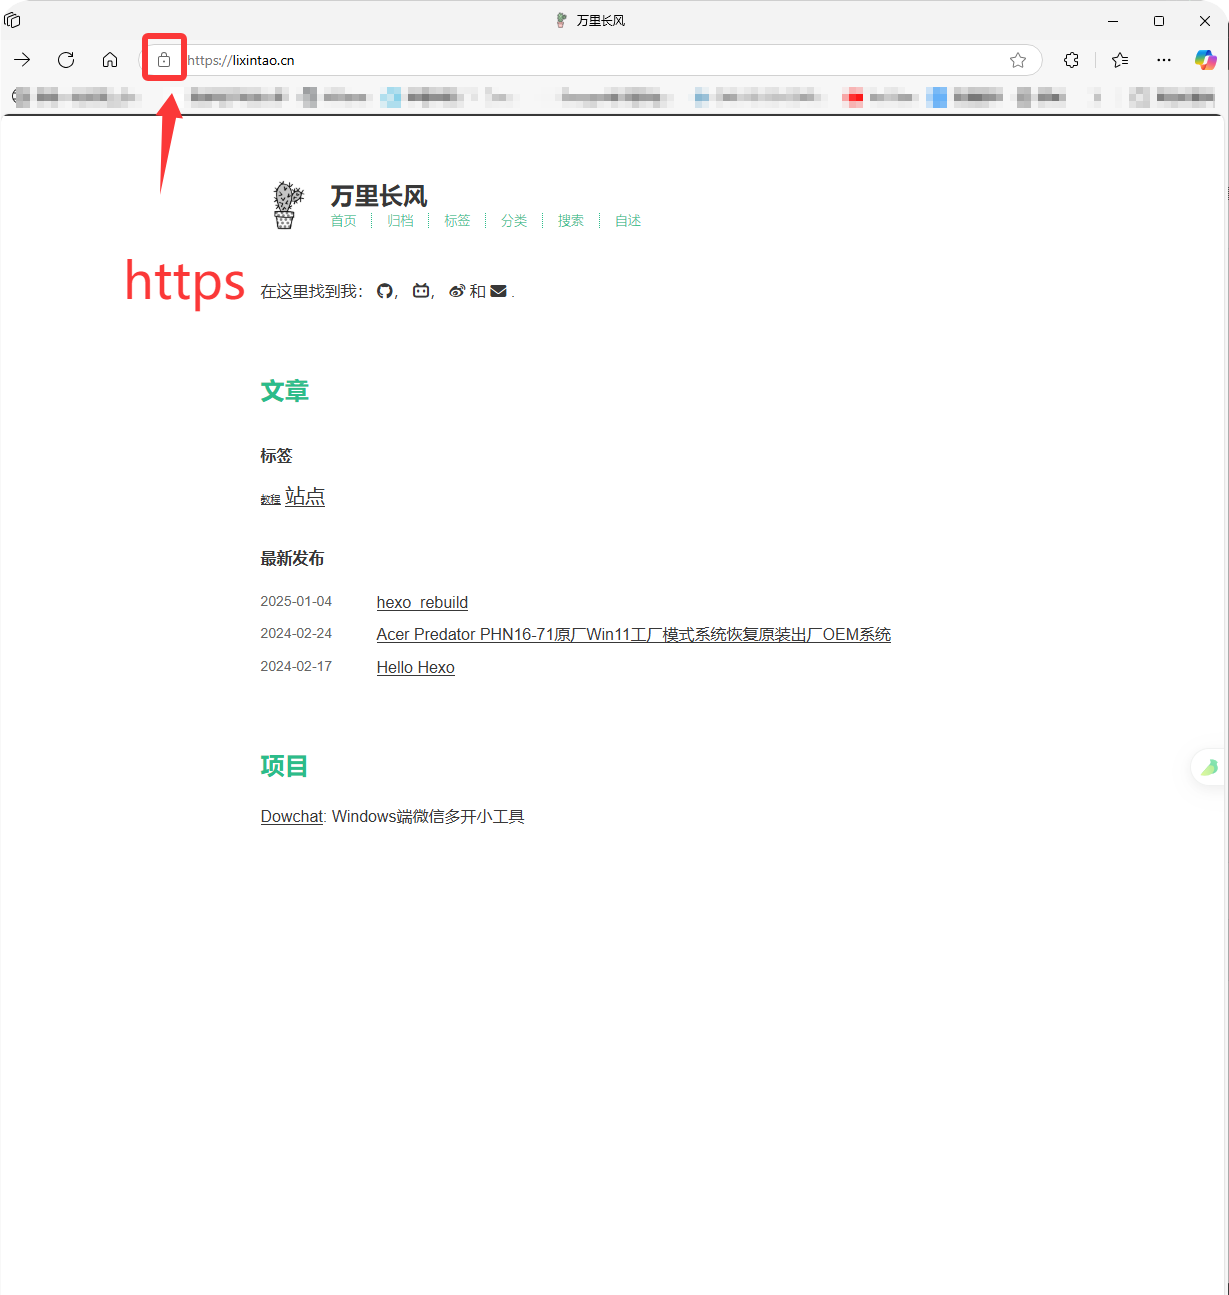
注意:浏览器可能存在缓存,导致证书和重定向均不生效,推荐开启隐私模式验证。