全局Context
将Context设置成静态变量很容易会产生内存泄漏的问题,但是applicationContext全局只有一份,生命周期和APP的生命周期一致,所以选择强制忽略。
1
2
3
4
5
6
7
8
9
10
11
| class MyApplication : Application() {
companion object {
@SuppressLint("StaticFieldLeak")
lateinit var context: Context
}
override fun onCreate() {
super.onCreate()
context = applicationContext
}
}
|
还需要设置程序启动的时候应该初始化MyApplication类,而不是Application默认类,在AndroidManifest.xml文件中指定。
Intent传递对象
Serializable方式
Serializable是序列化的意思,表示将一个对象转换成可存储或可传输的状态。序列化后的对象可以在网络上进行传输,也可以存储到本地。
至于序列化的方法需要让一个类去实现Serializable这个接口。
1
2
3
4
5
6
7
8
9
10
11
12
| class Person : Serializable {
var name = ""
var age = 0
}
val person = Person()
person.name = "Tom"
person.age = 20
val intent = Intent(this, SecondActivity::class.java)
intent.putExtra("person_data", person)
startActivity(intent)
|
取出数据:
1
| val person = intent.getSerializableExtra("person_data") as Person
|
Parcelable方式
Parcelable方式的实现原理是将一个完整的对象进行分解,而分解后的每一部分都是Intent所支持的数据类型。
必须重写describeContents()和writeToParcel()这两个方法。
还必须在类中提供一个名为CREATOR的匿名类实现,需要重写 createFromParcel()和newArray()这两个方法。
1
2
3
4
5
6
7
8
9
10
11
12
13
14
15
16
17
18
19
20
21
22
23
| class Person : Parcelable {
var name = ""
var age = 0
override fun writeToParcel(parcel: Parcel, flags: Int) {
parcel.writeString(name)
parcel.writeInt(age)
}
override fun describeContents(): Int {
return 0
}
companion object CREATOR : Parcelable.Creator<Person> {
override fun createFromParcel(parcel: Parcel): Person {
val person = Person()
person.name = parcel.readString() ?: ""
person.age = parcel.readInt()
return person
}
override fun newArray(size: Int): Array<Person?> {
return arrayOfNulls(size)
}
}
}
|
取出数据:
1
| val person = intent.getParcelableExtra("person_data") as Person
|
Serializable的方式较为简单,但由于会把整个对象进行序列化,因此效率会比Parcelable方式低一些,所以在通常情况下,还是更加推荐使用Parcelable的方式来实现Intent传递对象的功能。
定制日志工具
1
2
3
4
5
6
7
8
9
10
11
12
13
14
15
16
17
18
19
20
21
22
23
24
25
26
27
28
29
30
31
32
33
34
35
36
37
38
39
40
41
42
43
44
45
| object LogUtil {
private const val VERBOSE = 1
private const val DEBUG = 2
private const val INFO = 3
private const val WARN = 4
private const val ERROR = 5
private var level = VERBOSE
fun v(tag: String, msg: String) {
if (level <= VERBOSE) {
Log.v(tag, msg)
}
}
fun d(tag: String, msg: String) {
if (level <= DEBUG) {
Log.d(tag, msg)
}
}
fun i(tag: String, msg: String) {
if (level <= INFO) {
Log.i(tag, msg)
}
}
fun w(tag: String, msg: String) {
if (level <= WARN) {
Log.w(tag, msg)
}
}
fun e(tag: String, msg: String) {
if (level <= ERROR) {
Log.e(tag, msg)
}
}
}
|
这样可以通过调整源码的方式,随时使能或者失能日志调试。
调试代码
方法一就是从头到尾运行,打断点调试,不赘述。
方式二是运行到某一页面,中途进入调试模式,使用Attach Debugger to Android Process功能即可。
深色主题
Force Dark
Force Dark就是这样一种简单粗暴的转换方式,并且它的转换效果通常是不尽如人意的。
右击res目录→New→Directory,创建一个values-v29目录,然后右击values-v29目录→New→Values resource file,创建一个styles.xml文件:
1
2
3
4
5
6
7
8
| <resources>
<style name="AppTheme" parent="Theme.AppCompat.Light.NoActionBar">
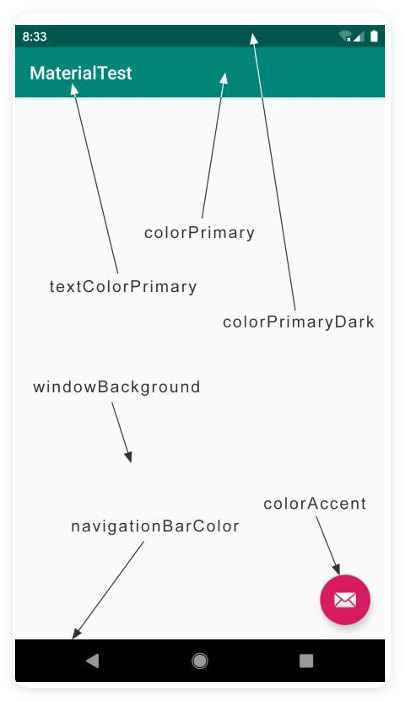
<item name="colorPrimary">@color/colorPrimary</item>
<item name="colorPrimaryDark">@color/colorPrimaryDark</item>
<item name="colorAccent">@color/colorAccent</item>
<item name="android:forceDarkAllowed">true</item>
</style>
</resources>
|
values-v29目录是只有Android 10.0及以上的系统才会去读取的,因此这是一种系统差异型编程的实现方式。
DayNight
更改values/styles.xml中的代码:
1
2
3
4
5
6
7
8
9
10
| <resources>
<!-- Base application theme. -->
<style name="AppTheme" parent="Theme.AppCompat.DayNight.NoActionBar">
<!-- Customize your theme here. -->
<item name="colorPrimary">@color/colorPrimary</item>
<item name="colorPrimaryDark">@color/colorPrimaryDark</item>
<item name="colorAccent">@color/colorAccent</item>
</style>
...
</resources>
|
右击res目录 →New→Directory,创建一个values-night目录,然后右击values-night目录→New→Values resource file,创建一个colors.xml文件。接着在这个文件中指定深色主题下的颜色值:
1
2
3
4
5
| <resources>
<color name="colorPrimary">#303030</color>
<color name="colorPrimaryDark">#232323</color>
<color name="colorAccent">#008577</color>
</resources>
|
Kotlin课堂
Java与Kotlin代码之间的转换:
- Java转Kotlin:Java赋值粘贴到kt文件中会自动提示转换,同时也可以使用导航栏中的Code→Convert Java File to Kotlin File功能,进行全项目转换。
- Kotlin转Java:先转化为字节码,在反编译转化为Java,点击Tools→Kotlin→Show Kotlin Bytecode,再点击这个窗口左上角的“Decompile”按钮,就可以将这些Kotlin字节码反编译成Java代码。